How Do I Remotely Access My Raspberry Pi? A Beginner’s Guide To Remote Control Magic
Ever wondered how to access your Raspberry Pi remotely like a tech wizard? Well, you’re in the right place, my friend. Remote access to your Raspberry Pi opens up endless possibilities, from running servers to controlling home automation systems. But hold up—before we dive deep, let me tell you this: remote access isn’t just cool; it’s essential if you want to take full advantage of your Pi’s capabilities.
Picture this: you’re chilling at a coffee shop, sipping on your favorite latte, and suddenly you need to check something on your Raspberry Pi back home. What do you do? Panic? Nope! With remote access set up, you can log in from anywhere, anytime, as long as you’ve got an internet connection. Sounds magical, right?
But here’s the deal—remote access isn’t as complicated as it sounds. In fact, once you get the hang of it, you’ll be wondering why you didn’t set it up sooner. So buckle up, because we’re about to break it down step by step. No tech jargon overload, just good ol’ conversational guidance that even your grandma could follow (well, maybe not your grandma, but you get the idea).
- Aditi Mistry Deep Hot Link The Ultimate Guide To Understanding The Viral Phenomenon
- Aditi Mistry New Hot Live Video The Buzz The Truth And Everything Inbetween
What Does Remote Access Mean for Your Raspberry Pi?
Remote access means being able to control and interact with your Raspberry Pi from another device, whether it’s a laptop, smartphone, or tablet, all without physically being near the Pi. Think of it like giving your Raspberry Pi a virtual hug from afar. And trust me, this feature is a game-changer for anyone who wants to maximize their Pi’s potential.
Now, why would you want to remotely access your Raspberry Pi? Here are a few reasons:
- Access files stored on your Pi from anywhere.
- Run scripts or programs without needing to sit in front of the Pi.
- Monitor and manage home automation systems, like smart lights or security cameras.
- Set up a headless Raspberry Pi (no monitor, keyboard, or mouse needed).
And the best part? It’s totally doable, even if you’re a tech newbie. Just follow along, and you’ll be a remote access pro in no time.
- Adity Mistry Live Video The Ultimate Guide To Understanding The Phenomenon
- Aditi Mistry Unseen Videos The Inside Scoop Youve Been Waiting For
Why Is Remote Access Important for Raspberry Pi Users?
Let’s face it—your Raspberry Pi is more than just a tiny computer. It’s a powerhouse that can handle everything from web servers to media centers. But what happens when you’re not around to physically interact with it? That’s where remote access comes in.
By enabling remote access, you’re essentially giving yourself superpowers. Imagine setting up a media server on your Pi and accessing your favorite movies while you’re on vacation. Or monitoring your home security system while you’re at work. The possibilities are endless, and they all start with one simple question: how do I remotely access my Raspberry Pi?
So, whether you’re a hobbyist tinkering with DIY projects or a pro developer building complex applications, remote access is a must-have skill. And don’t worry—we’re here to guide you every step of the way.
Setting Up SSH: The Gateway to Remote Access
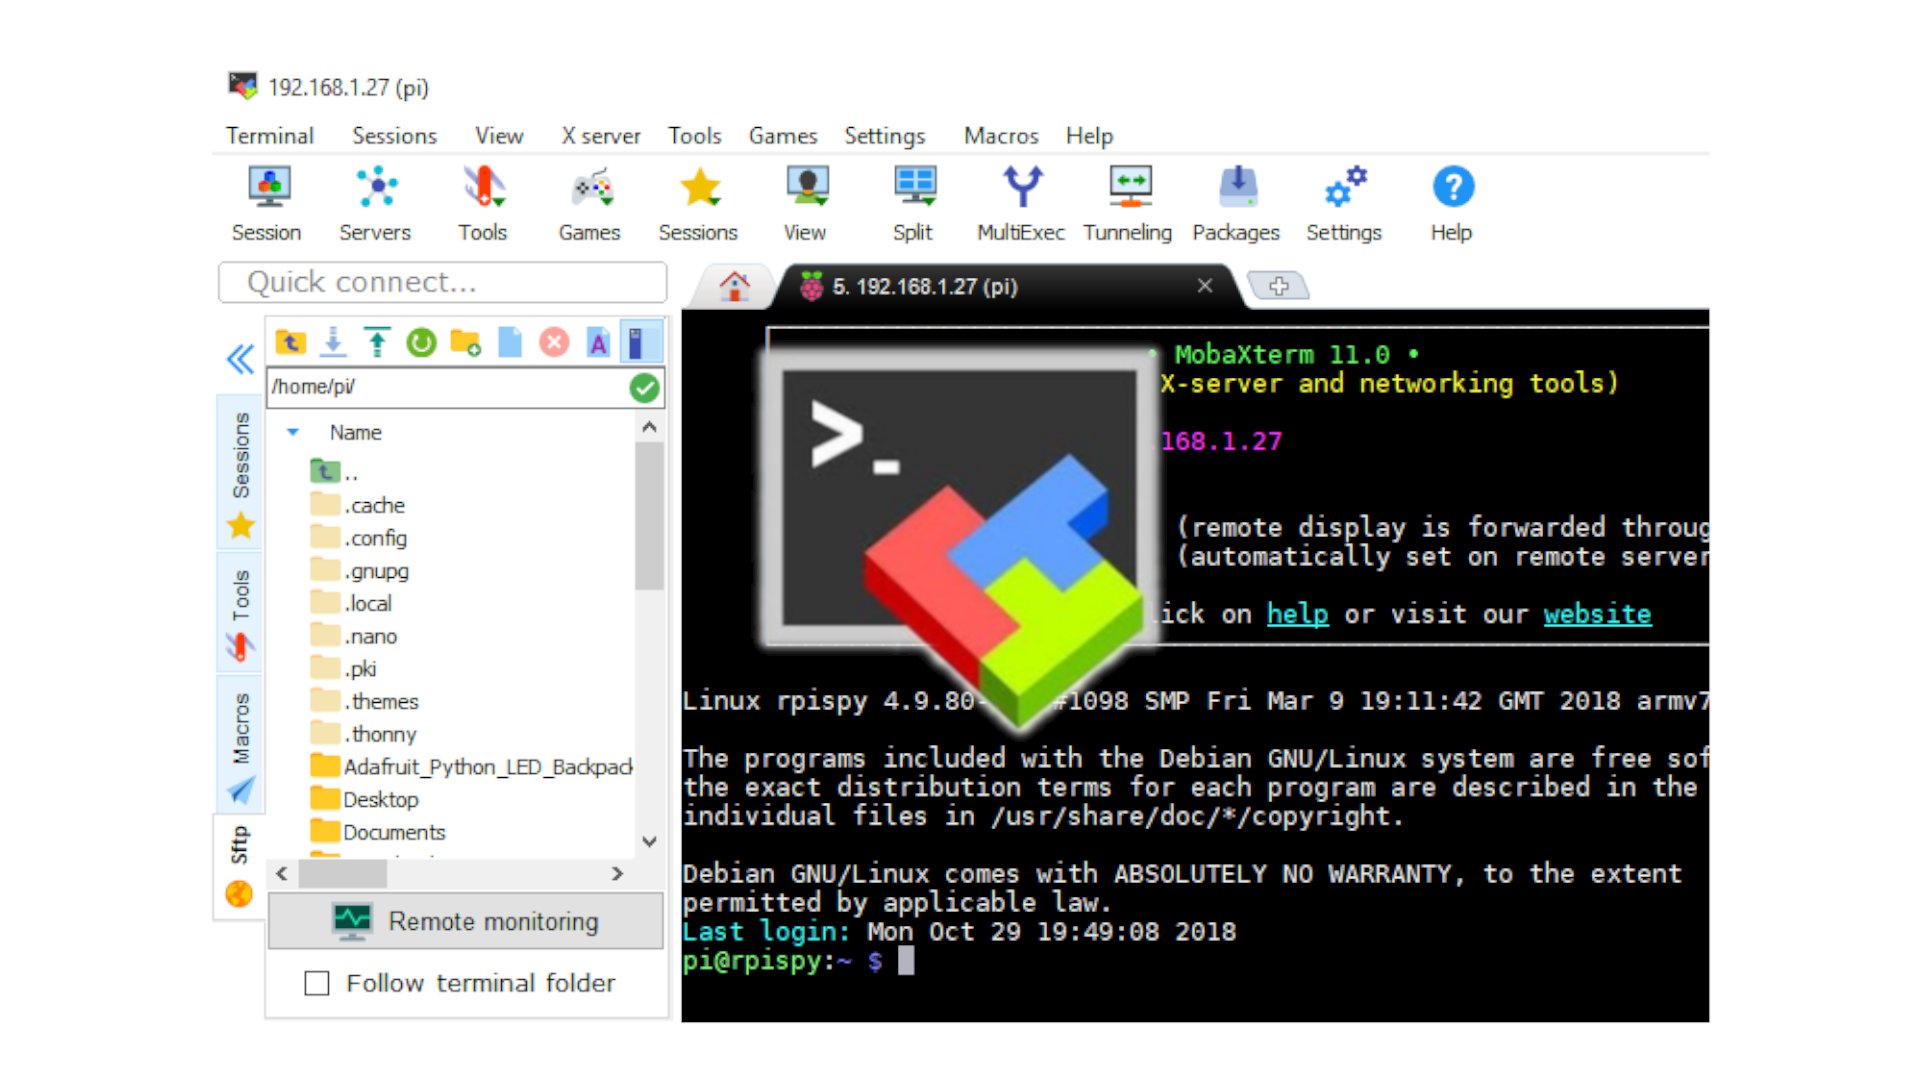
SSH, or Secure Shell, is the most popular method for remotely accessing your Raspberry Pi. It’s like a secret tunnel that lets you securely connect to your Pi from anywhere. And guess what? Setting it up is super easy.
Here’s how you do it:
- Enable SSH on your Raspberry Pi by going to
Raspberry Pi Configuration>Interfaces>SSHand selectingEnabled. - Find your Pi’s IP address by typing
hostname -Iin the terminal. - Install an SSH client on your remote device, like PuTTY for Windows or Terminal for macOS.
- Enter your Pi’s IP address and log in using your username and password.
And just like that, you’re in! SSH is fast, secure, and reliable, making it the go-to choice for most Raspberry Pi users. Plus, it’s free, which is always a bonus.
Tips for Secure SSH Connections
While SSH is secure by default, there are a few extra steps you can take to make it even more bulletproof:
- Change the default SSH port (usually 22) to something less obvious.
- Use strong, unique passwords for your Pi.
- Enable two-factor authentication for added security.
Remember, security is key when it comes to remote access. You don’t want some random hacker gaining access to your Pi, do you? Exactly.
Exploring VNC for Remote Desktop Access
If SSH isn’t your cup of tea, there’s another option you might want to consider: VNC. VNC, or Virtual Network Computing, allows you to remotely control your Raspberry Pi’s desktop interface. It’s like sitting in front of your Pi, but from miles away.
Here’s how to set it up:
- Enable VNC on your Raspberry Pi by going to
Raspberry Pi Configuration>Interfaces>VNCand selectingEnabled. - Download a VNC client on your remote device, like RealVNC Viewer.
- Enter your Pi’s IP address and log in using your credentials.
VNC is perfect if you prefer a graphical interface over command-line tools. It’s a bit slower than SSH, but it’s still a great option for those who need a more user-friendly experience.
Pros and Cons of Using VNC
Like anything, VNC has its pros and cons. Here’s a quick rundown:
- Pros: Easy to use, no need for technical knowledge, perfect for beginners.
- Cons: Slower than SSH, requires more bandwidth, not ideal for low-latency tasks.
Ultimately, the choice between SSH and VNC depends on your specific needs and preferences. There’s no right or wrong answer—just what works best for you.
Setting Up a Static IP Address for Your Raspberry Pi
One of the first things you should do when setting up remote access is assign a static IP address to your Raspberry Pi. Why? Because it makes connecting to your Pi much easier and more reliable.
Here’s how to do it:
- Open the terminal on your Pi and type
sudo nano /etc/dhcpcd.conf. - Scroll to the bottom of the file and add the following lines:
interface eth0
static ip_address=192.168.1.100/24
static routers=192.168.1.1
static domain_name_servers=192.168.1.1
3. Save the file and restart your Pi using sudo reboot.
Now your Pi will always have the same IP address, making it easier to connect to remotely. Trust me, this step will save you a lot of headaches in the long run.
Why Static IPs Are Important
Without a static IP, your Pi’s address can change every time it reconnects to your network. This can make remote access a real pain, especially if you’re trying to connect from outside your home network. By assigning a static IP, you ensure that your Pi’s address stays the same, no matter what.
And don’t worry—it’s not as scary as it sounds. Just follow the steps above, and you’ll be good to go.
Using Dynamic DNS for Remote Access from Anywhere
So you’ve got SSH and VNC set up, and your Pi has a static IP. But what happens when you’re not on the same network as your Pi? That’s where Dynamic DNS comes in.
Dynamic DNS, or DDNS, allows you to access your Pi using a domain name instead of an IP address. This is especially useful if your internet provider gives you a dynamic IP address that changes frequently.
Here’s how to set it up:
- Create an account with a DDNS provider like No-IP or DuckDNS.
- Install the DDNS client on your Raspberry Pi by following the provider’s instructions.
- Update your router settings to forward traffic to your Pi’s static IP address.
Now you can access your Pi from anywhere in the world using a simple domain name. How cool is that?
Tips for Configuring Port Forwarding
Port forwarding is a crucial step when setting up remote access from outside your network. Here’s how to do it:
- Log in to your router’s admin panel.
- Find the port forwarding section and create a new rule.
- Set the external port to match the service you’re using (e.g., 22 for SSH).
- Set the internal IP address to your Pi’s static IP.
Port forwarding can be a bit tricky, so don’t hesitate to consult your router’s manual if you get stuck.
Troubleshooting Common Remote Access Issues
Even the best-laid plans can go awry sometimes. If you’re having trouble accessing your Raspberry Pi remotely, here are a few things to check:
- Make sure SSH or VNC is enabled on your Pi.
- Double-check your Pi’s IP address.
- Ensure your router’s firewall isn’t blocking the necessary ports.
- Verify that your DDNS settings are correct.
Still stuck? Don’t worry—there’s a vibrant community of Raspberry Pi enthusiasts ready to help. Check out forums like Raspberry Pi Forums or Reddit’s r/Raspberry_Pi for advice and troubleshooting tips.
Staying Calm When Things Go Wrong
Remember, troubleshooting is just part of the process. Don’t get discouraged if things don’t work right away. Take a deep breath, go through the steps methodically, and you’ll get it sorted in no time.
Conclusion: Mastering Remote Access for Your Raspberry Pi
So there you have it—a comprehensive guide to remotely accessing your Raspberry Pi. Whether you choose SSH, VNC, or a combination of both, you now have the tools and knowledge to take full control of your Pi from anywhere in the world.
Remember, remote access isn’t just about convenience—it’s about unlocking the full potential of your Raspberry Pi. So go ahead, experiment, and see what you can achieve. And don’t forget to share your experiences in the comments below. We’d love to hear how you’re using remote access to level up your Pi game.
Happy tinkering, my friend! And as always, stay curious and keep learning. The world of Raspberry Pi is full of endless possibilities, and you’ve just taken the first step toward mastering it.
Table of Contents
- What Does Remote Access Mean for Your Raspberry Pi?
- Why Is Remote Access Important for Raspberry Pi Users?
- Setting Up SSH: The Gateway to Remote Access
- Tips for Secure SSH Connections
- Exploring VNC for Remote Desktop Access
- Pros and Cons of Using VNC
- Setting Up a Static IP Address for Your Raspberry Pi
- Why Static IPs Are Important
- Using Dynamic DNS for Remote Access from Anywhere
- Tips for Configuring Port Forwarding
- Troubleshooting Common Remote Access Issues
- Staying Calm When Things Go Wrong
- Conclusion: Mastering Remote Access for Your Raspberry Pi


Detail Author:
- Name : Dr. Lincoln Rolfson
- Username : tavares97
- Email : althea28@kihn.info
- Birthdate : 1986-05-24
- Address : 117 McKenzie Stravenue Suite 442 Nitzscheland, FL 57529
- Phone : 517-703-6795
- Company : Schmidt Inc
- Job : Dental Hygienist
- Bio : Velit debitis qui iste molestias dolore unde quis. Et facere maxime harum ut est quas fugit enim. Sunt voluptatem quia labore error aperiam odit sint.
Socials
linkedin:
- url : https://linkedin.com/in/bethany_dev
- username : bethany_dev
- bio : Id vitae sunt adipisci quia magnam.
- followers : 4265
- following : 193
twitter:
- url : https://twitter.com/morissetteb
- username : morissetteb
- bio : Eum eos voluptatem magni tenetur. Earum velit ex doloremque reiciendis. Veniam vero a laborum neque voluptatem error.
- followers : 2134
- following : 1125
tiktok:
- url : https://tiktok.com/@bethany.morissette
- username : bethany.morissette
- bio : Quidem excepturi voluptas nihil sit.
- followers : 2158
- following : 1457
instagram:
- url : https://instagram.com/morissette1979
- username : morissette1979
- bio : Quasi qui doloremque omnis itaque voluptatum. Et cupiditate deserunt corporis nulla eveniet quis.
- followers : 2569
- following : 2041
