Access Pi Remotely Free: A Beginner's Guide To Unlocking Your Raspberry Pi Anywhere
Hey there tech enthusiasts, if you're diving into the world of Raspberry Pi, chances are you've come across the term "access pi remotely free." Imagine being able to control your Raspberry Pi from anywhere in the world without spending a dime on fancy software. Sounds too good to be true? Well, buckle up because we’re about to break it down for you in a way that even your grandma could understand. Accessing your Pi remotely isn't just a tech perk; it's a game-changer for projects, tinkering, and even remote work setups.
Let's cut to the chase. Accessing your Raspberry Pi remotely for free is totally doable, but there are a few tricks and tips you need to know to get it right. Whether you're a beginner or a seasoned Pi pro, this guide will walk you through everything you need to set up a seamless remote connection without breaking the bank. So grab a coffee, sit back, and let's dive into the nitty-gritty of remote Pi access.
Before we get into the juicy details, let's clarify something. When we say "access pi remotely free," we're talking about connecting to your Raspberry Pi from another device over the internet without any subscription fees. This isn't just about convenience—it's about empowering you to take full control of your projects without worrying about location. Ready? Let's go!
- Aditi Mistry Viral Sex Video The Untold Story You Need To Know
- Filmy Fly2025 Your Ultimate Guide To The Latest Buzz In Aviation
Why Access Pi Remotely Free Matters
In today's digital age, having the ability to access your Raspberry Pi from anywhere is more than just a cool feature—it's essential. Whether you're managing home automation systems, monitoring servers, or just tinkering with code, remote access gives you the flexibility to stay connected without being physically present. And the best part? You don't have to pay a cent to make it happen.
Convenience at Your Fingertips
Picture this: you're on vacation, but you want to check on your home security system powered by your Raspberry Pi. With remote access, you can log in and ensure everything's running smoothly without lifting a finger. It's like having a virtual assistant for your tech projects, all without the hefty price tag.
Cost-Effective Solutions
Let's face it—subscription-based services can add up quickly. By learning how to access your Pi remotely for free, you're not only saving money but also gaining a valuable skill that can enhance your tech repertoire. Who needs expensive software when you've got open-source tools and a bit of know-how?
- Adity Mistri Hot Live Your Ultimate Guide To The Rising Star
- Adity Mistry Live Video The Ultimate Guide To Understanding The Phenomenon
Enhanced Project Management
For hobbyists and professionals alike, remote access simplifies project management. You can troubleshoot issues, update software, and even collaborate with others in real-time—all from the comfort of your couch or a café halfway around the world.
Understanding the Basics of Remote Access
Before we dive into the technical side of things, let's take a moment to understand what remote access really means. At its core, remote access allows you to connect to one device from another over a network. In our case, we're talking about accessing your Raspberry Pi from another computer, tablet, or even your smartphone.
What You Need to Get Started
To access your Pi remotely for free, you'll need a few basic tools:
- A Raspberry Pi (duh!) with an active internet connection.
- A secondary device (like a laptop or smartphone) to connect from.
- A reliable SSH client or remote desktop software.
- Your Pi's IP address or domain name.
Don't worry if some of these terms sound foreign—we'll break them down as we go along.
SSH vs. Remote Desktop: What's the Difference?
When it comes to remote access, you've got two main options: SSH (Secure Shell) and Remote Desktop. SSH is a command-line interface that's perfect for running scripts and managing files, while Remote Desktop gives you a full graphical interface. Both are free and easy to set up, so it really depends on your preference and the type of work you're doing.
Setting Up Your Pi for Remote Access
Now that you know what you need, let's talk about the setup process. First things first: make sure your Raspberry Pi is up and running with the latest version of Raspberry Pi OS. Once that's done, you'll want to enable SSH and configure your network settings. Trust me, it's easier than it sounds.
Step-by-Step Guide to Access Pi Remotely Free
Ready to roll up your sleeves and get to work? Here's a step-by-step guide to setting up remote access for your Raspberry Pi:
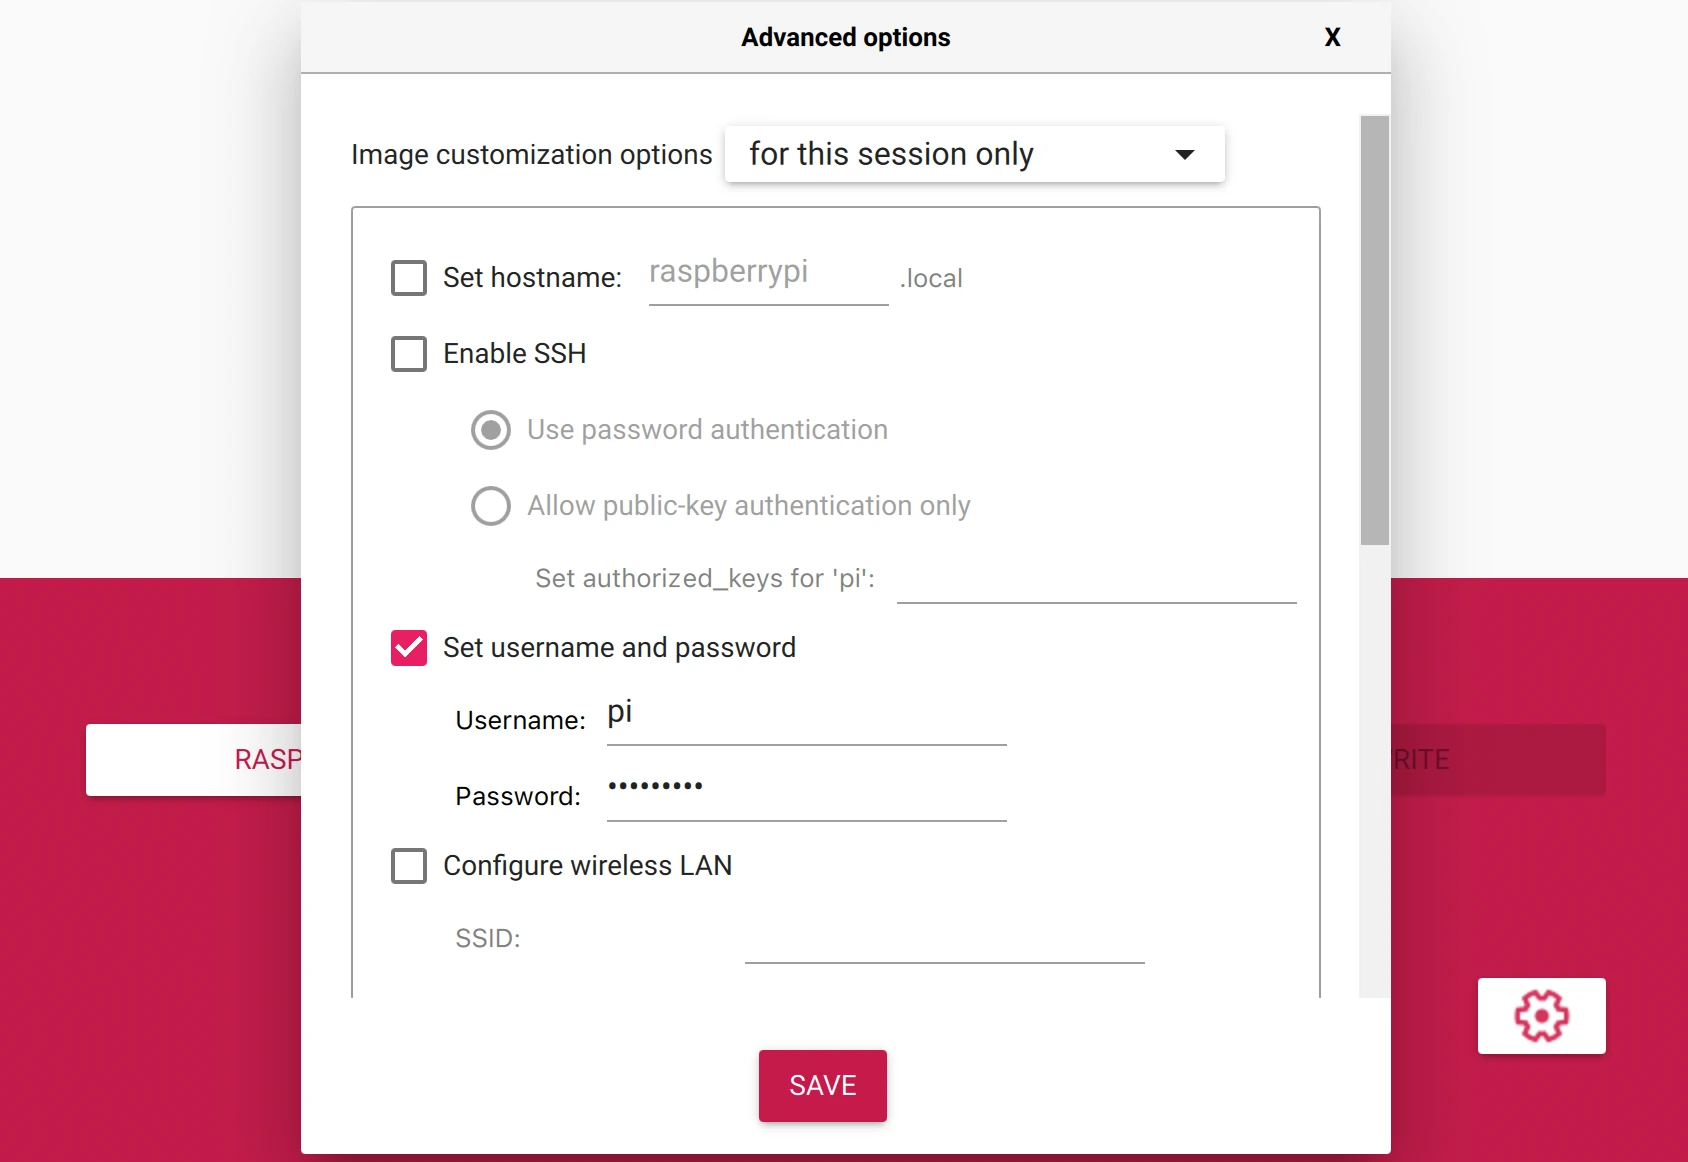
Enable SSH on Your Pi
SSH is the backbone of remote access, so the first step is to enable it on your Raspberry Pi. You can do this by opening the Raspberry Pi Configuration tool, navigating to the Interfaces tab, and toggling SSH to "Enabled." Alternatively, you can use the terminal by typing:
sudo raspi-config
From there, select "Interfacing Options," choose SSH, and hit "Enable." Easy peasy, right?
Find Your Pi's IP Address
Next, you'll need to know your Pi's IP address. You can find this by typing:
hostname -I
into the terminal. This will give you the local IP address of your Pi, which you'll need to connect remotely.
Set Up Port Forwarding
Port forwarding is the magic that allows you to access your Pi from outside your local network. To set it up, log in to your router's admin panel and forward port 22 (the default SSH port) to your Pi's local IP address. Be sure to note down your router's external IP address, as you'll need this to connect from outside your network.
Install an SSH Client
Now that your Pi is all set up, it's time to install an SSH client on your secondary device. For Windows users, PuTTY is a popular choice, while macOS and Linux users can use the built-in terminal. Simply enter your Pi's external IP address and hit connect. Voilà! You're now connected to your Pi remotely.
Advanced Techniques for Secure Remote Access
While the basic setup is great for most users, there are a few advanced techniques you can use to enhance security and make your remote access even smoother.
Use a Dynamic DNS Service
If your internet provider assigns a dynamic IP address, you might find it difficult to connect to your Pi consistently. That's where a dynamic DNS (DDNS) service comes in. Services like No-IP or DuckDNS allow you to assign a static domain name to your Pi, making it easier to connect no matter what your IP address is.
Set Up a Virtual Private Network (VPN)
For an added layer of security, consider setting up a VPN on your Pi. This encrypts your connection and ensures that your data remains private, even when accessing your Pi from public Wi-Fi networks.
Automate Your Connections
Tired of typing in IP addresses and passwords every time you want to connect? Automate the process by using SSH keys. Generate a public and private key pair on your secondary device and copy the public key to your Pi. From then on, you'll be able to connect without entering a password each time.
Common Issues and Troubleshooting
Even the best-laid plans can hit a snag, so let's go over some common issues you might encounter when trying to access your Pi remotely.
Can't Connect to Your Pi?
If you're having trouble connecting, double-check your IP address and ensure that port forwarding is set up correctly. Also, make sure that SSH is enabled on your Pi and that your firewall isn't blocking the connection.
Slow Connection Speeds
Sometimes, remote connections can be sluggish. To speed things up, try optimizing your network settings or using a faster internet connection. If you're using Remote Desktop, consider lowering the resolution or disabling visual effects.
Security Concerns
Security is always a top priority when it comes to remote access. Make sure you're using strong passwords, enable two-factor authentication if possible, and keep your software up to date. And if you're feeling extra cautious, consider changing the default SSH port to something less obvious.
Real-World Applications of Remote Pi Access
Now that you know how to access your Pi remotely for free, let's talk about some real-world applications that make this skill so valuable.
Home Automation
With remote access, you can control smart home devices, monitor security cameras, and adjust settings from anywhere in the world. It's like having a personal assistant for your home.
Server Management
If you're running a web server or other network services on your Pi, remote access allows you to manage them without being physically present. This is especially useful for small businesses or freelancers who need to keep their operations running smoothly.
Educational Projects
For students and educators, remote access opens up a world of possibilities. You can collaborate on projects, share resources, and even teach coding remotely—all using a Raspberry Pi.
Conclusion: Take Your Pi to the Next Level
And there you have it—a comprehensive guide to accessing your Raspberry Pi remotely for free. Whether you're a hobbyist, a professional, or just someone who loves tinkering with tech, this skill will take your projects to the next level. Remember, the key to success is understanding the basics, setting up your system correctly, and staying secure.
So what are you waiting for? Grab your Pi, follow the steps, and start exploring the world of remote access. And don't forget to share your experiences in the comments below or check out our other articles for more tech tips and tricks. Happy tinkering!
Table of Contents
- Why Access Pi Remotely Free Matters
- Understanding the Basics of Remote Access
- Step-by-Step Guide to Access Pi Remotely Free
- Advanced Techniques for Secure Remote Access
- Common Issues and Troubleshooting
- Real-World Applications of Remote Pi Access
- Conclusion


Detail Author:
- Name : Abigale Ratke
- Username : jermain.sporer
- Email : thompson.dean@gorczany.info
- Birthdate : 1975-05-14
- Address : 60964 Bashirian Path Ryannborough, IL 67686-5320
- Phone : 517.799.2919
- Company : Von, Bergstrom and Rohan
- Job : Ship Mates
- Bio : Consequuntur aut earum aut. Consectetur qui laboriosam non cumque aliquid molestiae tenetur. Tempore praesentium tenetur at. Voluptatibus accusantium quia dolorem sapiente ut occaecati.
Socials
twitter:
- url : https://twitter.com/dejahcollins
- username : dejahcollins
- bio : Sit nobis ipsum natus repellendus velit. Illum labore nam ut numquam optio id.
- followers : 1618
- following : 748
linkedin:
- url : https://linkedin.com/in/dejah_id
- username : dejah_id
- bio : Consequatur ut qui est veritatis dolorem.
- followers : 1125
- following : 2212
